Chocolate Christmas Candy Recipes

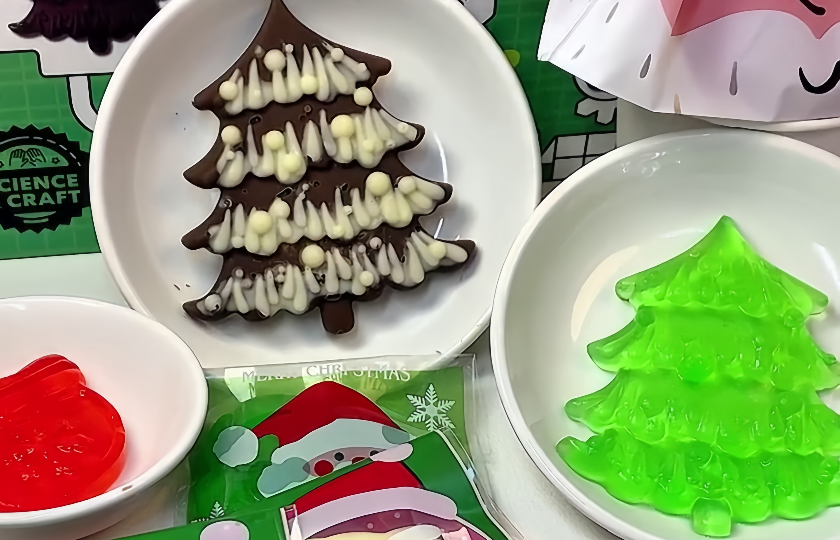
As Christmas is approaching, the baking atmosphere in the kitchen is getting stronger. Chocolate Christmas candies can not only bring holiday joy but also become warm gifts for relatives and friends.
Required raw materials and substitutes
Main ingredients
Colored candies: Provide a basic shape. Different colors can be chosen for matching to add to the holiday atmosphere.
Dark chocolate: Fine texture and mellow taste. It is the main material for the decorative layer.
White chocolate: Used to simulate the snow scene effect and add a sense of layering and holiday atmosphere.
Substitutes
Colored candies: Syrup colored with edible pigments can be used as a substitute. Pay attention to the concentration.
Dark chocolate: Cocoa butter substitute chocolate can be chosen. It is easier to operate but the taste is slightly inferior.
White chocolate: Cream frosting can be used as a substitute, but pay attention to moisture-proof.

Required tools
Cup: A container for preparing sugar syrup.
Christmas molds: Contain shapes such as Christmas trees, gifts, Santa Claus, reindeer, snowmen and wishing socks.
Wrapping container: Used to wrap chocolate so that it melts without leaking out.
Toothpick: Mainly used to smooth chocolate to ensure uniformity and no bubbles.
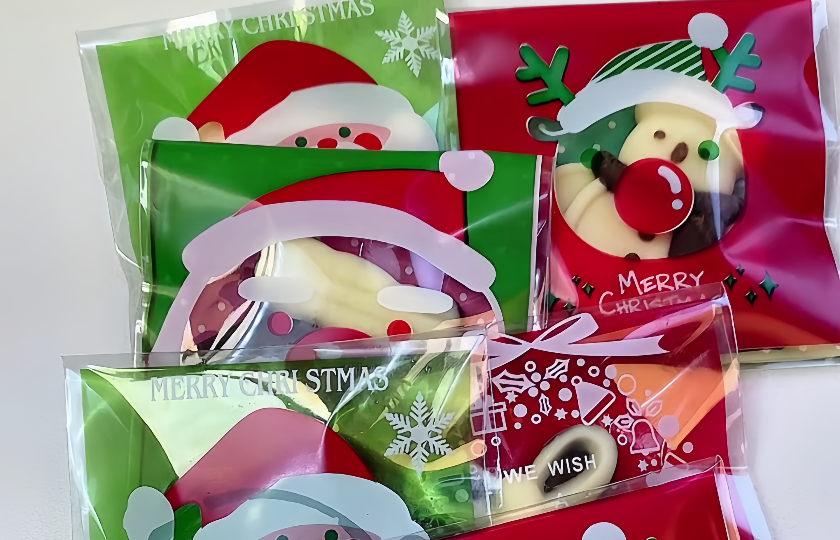
Packaging materials: Used for making beautiful packaging.
How long does it take to solidify?
Solidification time: 15 minutes at room temperature for sugar syrup and 5 minutes in the refrigerator; 30 minutes at room temperature for chocolate and 10 minutes in the refrigerator. According to production experience, it is easiest to succeed in an environment of 25 degrees in an air-conditioned room.
Production suggestions: Placing the mold on a ceramic tile countertop or marble countertop has a better effect; when there are children at home, a non-slip mat can be placed under the mold; before demolding, gently touch the surface with your finger, and it can be taken out only when it is completely hardened.
Will the two kinds of chocolates mix?
White and black chocolates will slightly mix, especially at the junction of piped decorations. This is a normal phenomenon and can instead form a natural gradient effect.
Control method: The first layer of white chocolate must be completely solidified and not sticky to the touch before squeezing in black chocolate.
In actual operation, gently drawing a toothpick across the junction of the two kinds of chocolates can form a natural snowflake pattern, which is especially suitable for Christmas-themed decoration.
INGREDIENTS
Main Ingredients
-
·2 packs colored candies
-
·200g dark chocolate
-
·100g white chocolate
COOKING STEP
Step 1
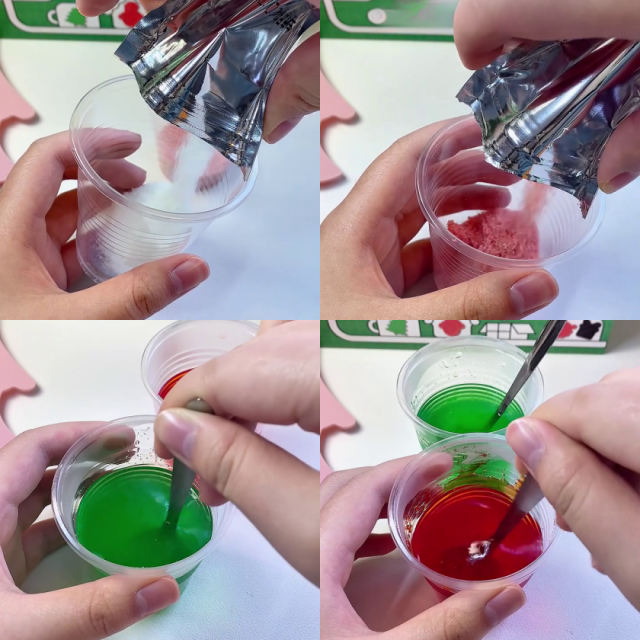
Pour two different colors of sugar into two cups respectively. Add a little clear water to each cup and stir evenly respectively.

Step 2
Pour the prepared sugar syrup into Christmas-themed molds. The molds contain shapes such as Christmas trees, gifts, Santa Claus, reindeer, snowmen and wishing socks.

Step 3
Let the mold stand still and wait for the sugar syrup to solidify and take shape. This process is relatively fast. Pay attention to avoiding shaking the mold.

Step 4
After the sugar cubes solidify, demold them. Carefully take out candies of various shapes to ensure complete shapes.

Step 5
Prepare hot water for water bath heating of chocolate. Put the chocolate in the inner container and slowly melt it while maintaining an appropriate temperature.

Step 6
Squeeze white chocolate into the positions that need a snow effect in the candy mold. Use a toothpick to carefully process to ensure even distribution.

Step 7
Except for snowmen and Santa Claus, squeeze black chocolate on the upper layer of white chocolate and carefully adjust with a toothpick.

Step 8
Pay special attention that only white chocolate decoration should be retained on the antlers of reindeer. Other parts are processed as usual.

Step 9
After patiently waiting for the chocolate decoration layer to completely solidify, carefully perform the second demolding.

Step 10
Finally, beautifully package each finished candy. The Christmas chocolate candy is completed.

More recipes worth trying
Ma Lai Go Chinese Steamed Cake
Glossy Crystal-Coated Candied Apples
Bubble Tea Cake - Tea-Infused with Chewy Pearls
How to store?
Handmade chocolate candies can be stored at room temperature at home for 3 days and in the refrigerator for a week.
The practical storage suggestion is to wrap each candy individually with a fresh-keeping bag, put it into a sealed box, and then put it in the refrigerator's fresh-keeping compartment. If there is a transparent storage box at home, it is very suitable. You can directly see the candies inside and it is convenient to take.
Only take out the amount to be eaten on that day each time. Usually, the refrigerator is opened and closed frequently. Taking out the whole box and putting it back will cause water droplets to condense on the surface of the candies, which is easy to become damp and moldy.
Recipe Variations
Basic flavors:
Matcha flavor: Add 2 grams of matcha powder to white chocolate. The taste is fresh and not bitter, suitable for afternoon tea.
Coffee flavor: Add 1 packet of instant coffee powder to enhance the richness of bitter chocolate.
Fruit flavors:
Strawberry flavor: Add 5 grams of strawberry jam or strawberry powder, paired with a white chocolate background.
Blueberry flavor: Crush 3 dried blueberries and mix them in. It not only adds texture but also decorates.
Innovative combinations:
Filled version: Add cookie crumbs or wafers in the middle to increase the chewing sensation.
Two-tone layer: Use white chocolate as the base and place milk chocolate on the upper layer. When cut, it has a sense of layering.
FAQs:
Temperature control: Chocolate will deteriorate and turn white if heated in water with a temperature exceeding 50 degrees, or it will not melt enough if the temperature is too low. It is recommended to use water at around 45 degrees. Use the completely melted chocolate immediately and avoid repeated heating.
Operating skills: Act quickly when decorating. Once the chocolate starts to solidify, it is difficult to adjust. Keep your hand steady when squeezing out patterns and apply force evenly. It is recommended to practice on oil paper first. When demolding, if you use too much force, it will damage the shape. You can gently pat the back of the mold.
Environmental factors: High room temperature will affect solidification. It is best to keep the room temperature at 20-25 degrees during production and avoid direct sunlight. If the weather is humid, dry the mold in advance to prevent water vapor from affecting the finished product.
The criterion for judgment is that the sugar syrup appears uniformly transparent. When stirred with a spoon, there is no rustling sound and no sugar particles can be seen. If too much water is added, it will affect solidification. It is recommended to try with a very small amount of water first.
Stir a few times finally before pouring the sugar syrup into the mold to ensure there is no layering. When pouring, the action should be continuous to avoid generating bubbles. If there are bubbles, you can pick them out with a toothpick.
The specific technique is to gently press around the mold first to make the edge of the candy slightly separate from the mold. Then turn the mold over, press the center of the back of the mold with the thumbs of both hands, and hold the edge of the mold with other fingers and apply even force. Avoid excessive or uneven force to prevent the candy from breaking.
For shapes that are difficult to take out, such as the tip of a Christmas tree or the antlers of a reindeer in detailed parts, you can gently twist the mold first. After the candy loosens, take it out as a whole. If it is really too tight, put the mold in the refrigerator for 5 minutes and then try demolding again, which will be easier.
During the melting process, stir from time to time to ensure even heating. After the chocolate is completely melted, use it immediately to avoid thickening due to a decrease in temperature. If it thickens, you can heat it in a water bath again, but do not repeatedly heat it more than twice.


