How to Bake Christmas Cookies in Air Fryer

The Christmas bells are about to ring. Nothing can create a more joyful atmosphere than making a batch of sweet and crispy Christmas cookies by hand. By cleverly using an air fryer, deliciousness can be obtained without complicated procedures.
Why do I recommend making cookies with an air fryer?
Healthy and oil-free: The air fryer cooks food through high-speed air circulation technology and does not need to add a large amount of oil. Therefore, the cookies made are healthier and suitable for people who pursue a low-fat diet.
Easy operation: The operation of the air fryer is relatively simple. Just set the temperature and time, and put the cookies into the frying basket to start cooking.
Save time: Compared with traditional ovens, the air fryer has a shorter preheating time and a faster cooking speed, which can save a lot of time.
Basic Ingredients
Butter: 150g. It is the "soul" ingredient of cookies and gives cookies a rich and mellow milky fragrance.
Powdered sugar: 75g. Fine powdered sugar can not only accurately control the sweetness of cookies but also make the finished product have a delicate taste without any graininess. Compared with white granulated sugar, powdered sugar is easier to blend into butter and can be quickly and evenly dispersed when stirring.
Room temperature egg liquid: 30g. Egg liquid adds moisture and stickiness to the dough, promotes the close combination of ingredients, and can also introduce a faint egg fragrance and enrich the flavor of cookies. Be sure that the egg liquid is at room temperature to prevent the butter from solidifying due to temperature difference and affect whipping.
Low-gluten flour: 300g. Low-gluten flour has a low protein content and less gluten. It is the best choice for making crispy cookies. When sifting flour, impurities can be removed to make it fluffier and facilitate the fusion with butter and egg liquid to achieve a smooth dough.
Coloring powders (optional): Cocoa powder, matcha powder, and red yeast powder, each 5 - 6g. If you want the cookie shape to be outstanding and fit the colorful Christmas atmosphere, these coloring powders are essential. Cocoa powder creates a deep and rich chocolate flavor; matcha powder brings a fresh and elegant green; red yeast powder renders a festive and warm red.

Production steps
Softening and whipping butter:
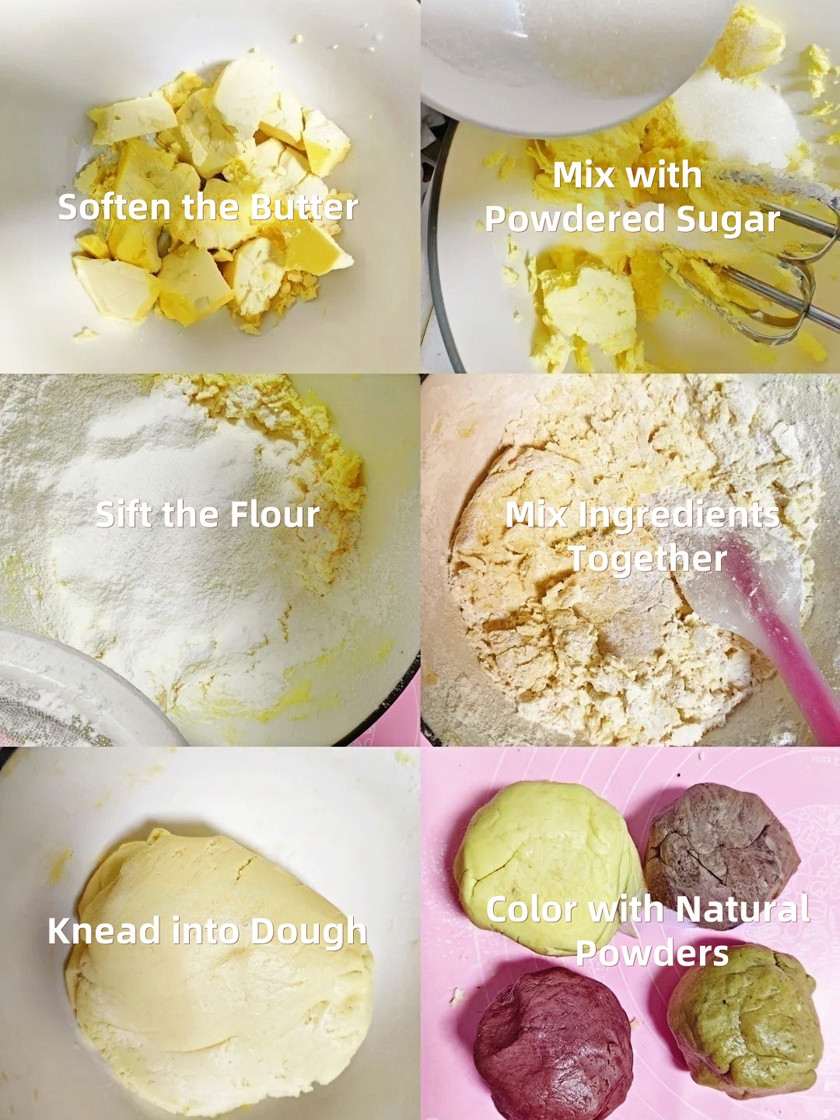
After leaving 150g of butter at room temperature for a while, if the softening degree is not enough, you can microwave it at low power for 10 - 20 seconds. Soften it until a finger can leave a mark when pressed lightly. Pour in 75g of powdered sugar and turn on an electric mixer to beat at low speed. At first, the powdered sugar and butter are in a loose state. As beating continues, the two gradually blend, the color becomes lighter, and the volume expands until it becomes a fine and fluffy cream-like state, which takes about 2 - 3 minutes.
Adding egg liquid:
Slowly add 30g of room temperature egg liquid to the whipped butter in 2 - 3 times. After each addition, immediately use a mixer to stir evenly at low speed. Pouring in the egg liquid too quickly or all at once can easily cause oil-water separation and affect the texture of the dough. When the egg liquid is completely integrated, the butter paste becomes thicker and the color is whiter.
Kneading dough with flour:
Sift 300g of low-gluten flour into the mixing bowl. First, use a spatula to initially mix by turning over. Turn from the bottom up to let the flour evenly coat the butter paste. When the dry powder decreases, gently knead the dough by hand. The technique should be gentle to avoid making the dough glutenous until a smooth and non-sticky dough is formed. If making colored cookies, divide the dough into four equal parts at this moment and add 5 - 6g of coloring powder respectively and knead evenly and thoroughly.
Shape design:
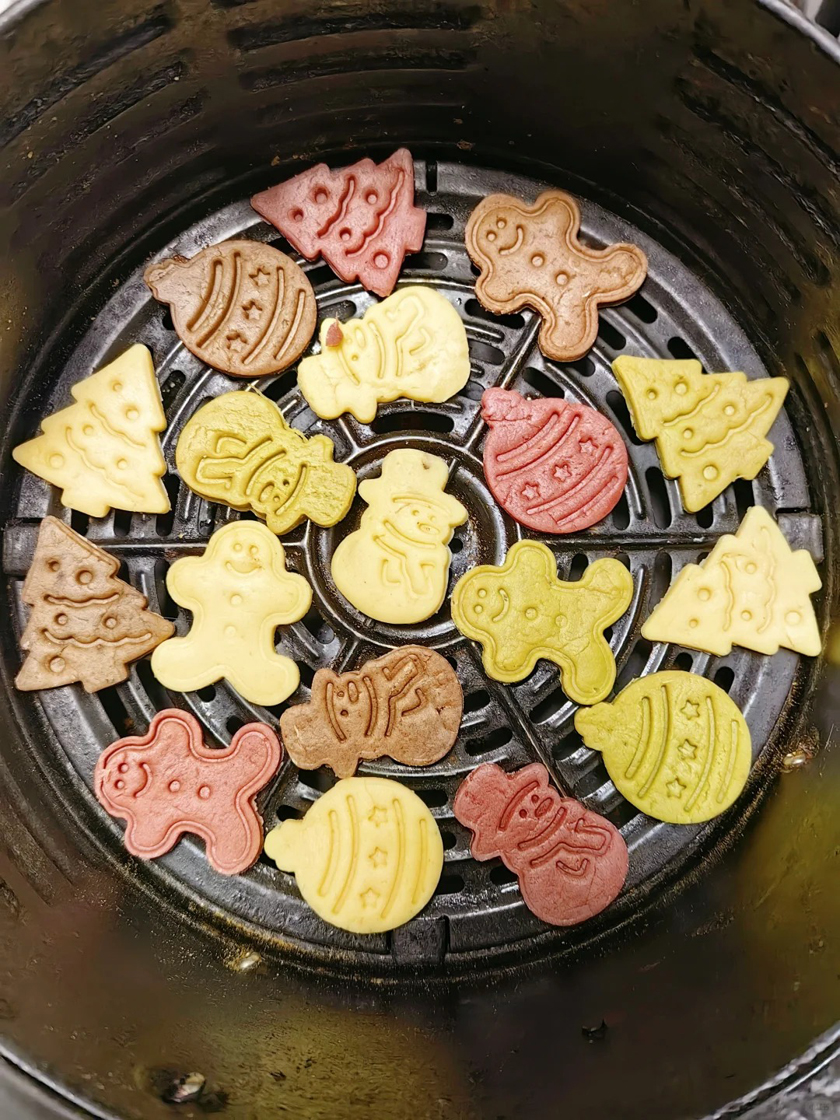
When the dough is ready, you can show your skills. Take a small piece of dough and roll it into a thin sheet 3 - 4 millimeters thick. Use Christmas-themed molds, such as gingerbread men, Christmas trees, snowflakes, etc., to press out shapes accurately. If there is no mold, simply cutting into squares or circles also has a unique flavor.
Baking in an air fryer:
Adjust the air fryer to preheat at 150℃ for 3 - 5 minutes in advance to eliminate the temperature difference and ensure stable baking results. Place the cookie blanks neatly in the frying basket, leaving an appropriate gap to prevent adhesion. Set the baking time for 20 minutes. Carefully turn over the cookies halfway through at 10 minutes. Observe the color of the cookies. When the edges are golden and the surface is evenly colored, it means they are fully cooked.
Decorating (optional):
The freshly baked cookies are fragrant. After cooling, decoration is easier to shape. You can use icing to draw beautiful patterns and write Christmas greetings; sprinkle colorful chocolate chips and silver sugar beads to add a playful touch; brush a thin layer of honey and then sprinkle edible gold and silver powders to make the cookies "transform gorgeously" in an instant.

Tips for making cookies with an air fryer
Preheat the air fryer:
Before putting in the cookie blanks, preheat the air fryer for 3 to 5 minutes to make the temperature in the frying pot uniform and stable. Let the cookies be in a stable heating environment from the beginning, which helps reduce deformation.
Arrange cookies reasonably:
When putting the cookie blanks into the air fryer, pay attention to keeping a certain distance between the cookies to avoid the cookies sticking to each other or sticking together after expansion during the baking process, which affects the appearance and shape of the cookies.
Control baking temperature and time:
According to the cookie recipe and size, choose the appropriate baking temperature and time. If the temperature is too high, the surface of the cookies will quickly set, and the internal gas expansion may cause the cookies to deform; if the temperature is too low, the cookies will be baked for too long, and excessive moisture will be lost, which may also cause the cookies to shrink and deform.
Pot-sealing treatment:
After the cookies are baked, don't rush to take them out. Let the cookies simmer in the air fryer for 2 to 3 minutes. Use the residual heat to further shape the cookies and increase the crispiness of the cookies. At the same time, it also helps reduce deformation.

Do the finished cookies need to be put in the refrigerator?
Generally, they don't need to be put in the refrigerator.
When storing cookies made by an air fryer, after they are completely cooled, put them in a sealed container and store them at room temperature to maintain their crispy texture. Usually, there is no problem in storing them for about a week.
However, if you want to extend the storage time of cookies, you can also store them in the refrigerator.
But please note that the refrigerated cookies need to be warmed to room temperature before eating, otherwise the taste may be too hard.


